Recently on Two Yellow Birds Decor

Rustic Star Makeover with Paper

This past week we have been having lots of fun with end of summer events. We have been having parties with families, swimming, and going to the Zoo. So I apologize for not posting for a little bit! 

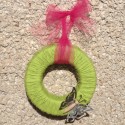
I have been working on getting more decor for my little Logan's room who is almost 10 months old! I found this rustic star and wanted to make it more personalized for his room. 

I first cut out a pattern to cut the paper with. 

Next, I painted it. I used a light blue called Robin's Egg. I forgot to take a picture of this step. Sorry!

While that was drying I cut the paper out. This was the hardest part for me. I had a few different papers that I wanted to use but in putting it together I ended up liking using only two different papers. You can definitely use more then that! 

After the star is dry, mod podge the paper on. I put a light coat on the star first to glue the paper down. Let that fully dry. Then I put a light coat over the paper. When that is fully dry, put another light coat on. While it was drying I did have small bubbles. They all left when it dried completely. I have learned not to mess with the bubbles unless they are really big ones which doesn't happen to often. 

When the mod podge is fully dry you can dress it up with some ribbons or other embellishments. 

Now you have a fun new personalized look to the star


Joining the Following:


Funky Junk's Saturday Nite Special

http://www.thegrantlife.com/search/label/financial%20friday

Backless Frame Quote

Ever wanted to take a boring frame and turn it into something cute and fun?!? We had this wood frame on hand and have not used it for anything. I decided it was time to do something cute with it!

I didn't like the color so first I painted the frame.
I took out the back of the frame and the glass and painted it. I chose Deep Burgundy for the color. It is going into my bedroom and that is the color I am accenting with. While the paint is drying clean the glass.

Next I chose the quote that I wanted and the font. I decided I wanted the words to be different. That took a little time getting things to match up together but if you would like to do what I did here are the fonts:
-Love (My own Topher) you Still , (Pea Sarah)  
-Always Will (Jailbird Jenna)

I then cut that out in black vinyl and put in on the glass.

I wanted to decorate it a little bit so I made a paper flower. The tutorial to make it can be found here

Next I hot glued the glass into place on the frame. 

Lastly, I hot glued the paper flower and leaves into place on the glass.

Here is the finished product:

Super cute way to dress up a boring frame!!


This post is linked to: 


Funky Junk's Saturday Nite Special


http://www.thegrantlife.com/search/label/financial%20friday

Paper Flower Tutorial

Here is how you make a paper flower...

First select the paper you want the flower to be. Then cut it. If you are choosing from paper that is 12" long, the biggest width you can do it 1.5". If you do it any wider (like I have tried to experiment with) it will not work. The paper is not long enough! Most of the time you want the paper 12" long if you are doing smaller then just adjust the width of the paper. The size I chose for this flower is 1.5"x12".

Then you want to fold it accordion style all the way. Fold the creases tightly, this will help a lot when forming the flower!!

Next you will glue the ends together. Let it sit for a minute so it will fully dry. It will look like this

After it dries you will gather the top of the paper together and push it down. If you folded the creases tightly it should go smoothly for you!

Then to finish you need 2 circles. I did mine 1.25". You will hot glue them to the flower on the front and back so the flower will stay in place. This glue holds the best, none of the others held it that I tried.


To top it off...


You can add some leaves and jewels to dress it up!!

Walah!! You now have a Super Cute paper flower!!

Joining the following:

http://www.thegrantlife.com/search/label/financial%20friday

I've Been Featured


I am so excited to tell you that I was featured at A Mommy's Life with a Touch of Yellow!! I was featured for my Look What I did board. This is the very first time I have been featured so it's big for me! Thank you so much Whitney!!

Look What I Did Board

My sweet little Kaitlyn started preschool at the beginning of August. She has been loving it so far! Her teacher told me that her favorite part of school is art. She has brought home many colorful pictures so of course I have to hang them up for everyone to see! I didn't really want to put them up all over the fridge so I came up with the idea to make a cute "Look What I Did" board. 

Here is miss Kaitlyn on her first day of preschool...


Here is what you will need to make the board:
-5 1/2" x 18" wood board
-Any color paint (I chose 2 colors because I put stripes on mine)
-Stain (I did early american)
-Vinyl letting
-Clips to hold the paper (I chose to do big ones because I liked the look but you could do smaller ones
-Screws
- Something to hang it with (I used "V" hangers)

The Process:
I sanded down the wood and painted it. 

I wanted to do something a little different so I put stripes on it. I used white and a grayish blue color. 

I then picked out the font. I used The Buns font found here. I did it in black vinyl.

After that was one I screwed the clips in place (well my cute hubby did!) and then I put the V hangers on and hung it up in the kitchen for all to see!

Kaitlyn is so proud to have her work hung up on the wall!


Joining the Following:
Funky Junk Interiors for SNS
http://www.thegrantlife.com/search/label/financial%20friday

Cupcake Liner Topiary Tutorial

I saw the cutest idea to make a cupcake liner topiary from A Mommy's Life With a Touch of Yellow. She did one back in March for St. Patrick's Day and I thought it was so cute. So I decided to make one. It will eventually go in my kitchen but since we are living with my parents it is just going into the bedroom for now. 

Here are the supplies you will need:
-Cupcake liners (I found mine at Michael's. I decided that I wanted two different types, but one type would be just fine.) I got 4 packages because I wanted to put them in tight.
-Styrofoam ball
-Hot glue gun and hot glue sticks
-2 wood dowels (I painted one and the other to help glue the cupcake liners in with. That way you don't get burned and it help gives it shape)
-Pot or some type of a container to put it in
-Styrofoam to put into the pot
-Ribbon
-Crafting grass
-Paint 

This is What I Did:
-First I spray painted my clay pot black so it would go with my black, white, and red color scheme. While that dried I worked on the next steps

-I painted the dowel red
-After it dried I glued it into the styrofoam ball so it would stay in place
-Then I started putting in the cupcake liners
-I wrapped the cupcake liner around the dowel giving a flat surface. I put some hot glue on the flat surface and pushed it into the styrofoam ball (Sorry its hard to see this step!)

-Hold it there for a few seconds giving it time to dry. There was a couple of times I didn't and it didn't stick very well!
-I just continued doing this all the way around the ball. Since I chose to use two different colors and patterns, I did two rows of the black and white and one row of red. It worked perfect to do that all the way to the top. 
-After it was completely done I put some styrofoam in the pot and put the topiary in. 
-To finished it I put fake crafting grass in to cover the styrofoam and put some ribbon around the pot. 

It is super cute and very easy! It just takes a little patience glueing the liners in!!

THE FINISHED PRODUCT:

It turned out exactly how I wanted it to! I am so happy with it!!


Joining the Following:
Funky Junk Interiors for SNS

I am a Child of God Boards

I have always loved these boards so I decided to make them for my kids! Here is what you need:

 *7"x18" wood board
*Any color paint (I used Pink for Kaitlyn and Lime Green for Logan)
*Stain
*Vinyl Lettering (I used white for there names and brown for the I am a Child of God)
*Some type of hanging device. I used little "v" hangers so I could use ribbon to hang them
*Ribbon to hang it 

I painted the top of it. When that dried I stained it all using the Early American Stain. 

This is the "v" hanger I used to hang it


Here is the result for Logan:

For his name I used the font Jailbird Jenna found here and for the I am a child of God I used Larger Mime found here.


Here is Kaitlyn's board:

For her name I used the font Wish I Were Taller found here and for the I am a child of God I used the font  Pea Sarah found here.

I am in love with how they turned out!!

Better Than Panda Express Mandarin Chicken

I know that this is not a craft or decor post but I just had to share this recipe with you. It is delicious!! Dave downloaded an app on his iPad that has a bunch of recipes on it. I have been trying some out. Some have not been so good, but there have been some that got a thumbs up!! This one definitely did! It is called Better Than Panda Express Mandarin Chicken. It is actually easy too which I love every once it awhile!!

The Recipe:

1 cup sugar
1/2 cup soy sauce
2 Tbs lemon juice
4 tsp garlic
1 tsp ginger
2  Tbs+2 tsp cornstarch
5 chicken breasts  (I usually only do 4 because the breasts I use are really big)


1) Bake or pan fry chicken until completely done, then cut into cubes (I like to boil them in water I feel like they have more moisture that way)

2) In a large pan or wok, mix together all remaining ingredients and simmer for about 15 minutes until sauce thickens, then add in the chicken. 


There is one thing that it does not call for that I like to add in it. Sesame Seeds!! They are so good in it!


I serve it over rice. SO YUMMY!! If you try it I hope you like it as much as we did!!

Joining the Following:

http://www.thegrantlife.com/search/label/financial%20friday
Blogging tips