Recently On Two Yellow Birds Decor

Ornament Wreath Plaque

First off, I am so sorry I have not posted for a few days. My family and I all came down with a flu bug. Not so much fun. So the last few days I have been trying to get things in order from all of us being down! But we are all the mend which is great. 

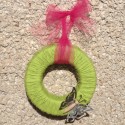
Today I am going to be showing you how to make a cute, simple ornament wreath plaque. 

When I bought these ornaments and opened them up I realized I could use the lid for something. As I was examining it more I realized the bottom came off too!! So I am going to be using both the top and bottom lids for our decor today! To get started I got 12 sliver ornaments gathered. I used 2 different patterns so 6 of each. Then I hot glued them all to the plastic lid. Here is a picture of what it looks like at this point...
When I got them all glued on I hot glued some red tulle in a loop so I would be able to hang it up.
Next, I made a cute Merry Christmas sign out of paper. I used the Joys of the Season cartridge for my Cricut to cut out the Merry Christmas. I used white vinyl. The lid was 6 1/2" wide so I cut the circle the same size. Then I added silver ribbon to the bottom for some added texture. I then hot glued the paper to the plastic lid.
Then I put a bunch of hot glue around the edge of the plastic lid circle on the back and glued it in the middle of the ornaments on top. 


And that's it!! Super simple and it is so fun for the Christmas season!!


Joining the following:


Totally Inspired Tuesdays
http://www.thegrantlife.com/search/label/financial%20friday
One Artsy Mama
Funky Junk's Saturday Nite Special

Everything Under the Moon

{Reindeer Poop} Neighborhood Christmas Gifts

I hope everyone had a wonderful and Happy Thanksgiving yesterday!! I had an awesome time being together with my husbands family. We had a super yummy turkey dinner at his brothers house!

I know with today being Black Friday, most of us have Christmas really in our minds now. So today I have a super cute and funny neighborhood Christmas gift to show you!! This is what we are doing for our family and friends this year. It is Reindeer Poop!!! Just so you know what this is all about here is the Poem for it...

I woke with such a fright when I heard Santa call...
"Now dash away, dash away, dash away all!"
I ran to the lawn and in the snowy white drifts,
those nasty reindeer had left "little gifts."

I got an old shovel and started to scoop
neat little piles of reindeer poop!
But to throw them away seemed such a waste,
so I saved them, thinking-you might like the taste!

As I finished my task, which took quite awhile,
old Santa passed by and he sheepishly smiled.
And I heard him exclaim as he sped off in the sky...
"Well they're not potty trained,
but at least they can fly!!"

Here is what I did to make it all cute!!
I got an old similac container from my little boy and "dressed it up" with some cute Christmas paper. 

I cut 2 strips of paper that were 4" wide by 7" long and glued them with a glue stick around the container. 
Next, I took red paper and tore it 2" wide and 7" long. I also did 2 strips of that. Then glued them on the bottom half of the container. 
Then, I cut out Merry Christmas in brown vinyl. I used the Joy of the Season cartridge for my cricut to cut it out. I also cut out an ornament and glued it next to the Merry Christmas. I put some red jewels on it to dress it up. The last step I did was cut out a brown circle in vinyl to put on the lid over the Similac words. Here is what the can looks like all done. 

Next I got a cute cellophane bag with gold stars on it and put a bunch of Whoppers in it for the "Reindeer Poop" and tied it off with gold ribbon and put it inside the can. It sat down a little low so I put a piece of tissue paper in the bottom to raise it up! I attached the lid to the bottom of the can. 


Using photoshop I designed my own tag with the poem to tie to the can. Here is what it looks like...
 I got them printed out at Costco in 4"x6".

***If you would like to use this tag for this same type of neighborhood gift, PLEASE feel free to email me at  2yellowbirdsdecor@gmail.com  and I can email it to you!! I would be more than happy to share!!***

Lastly, I tied this to the bag and curled the ribbon. Here is what it looks like all done!!!

Of course you DO NOT have to make the can to put it in. Here is what it looks like with just the bag of Whoppers...

I love the way it turned out!! I am SO EXCITED to pass them out!


Joining the following:


Funky Junk's Saturday Nite Special
One Artsy Mama
http://www.thegrantlife.com/search/label/financial%20friday
Totally Inspired Tuesdays

Everything Under the Moon

{Dollar Store} Christmas Vases

First off, Happy Thanksgiving this week everyone!!! I hope everyone has a fun day with fun traditions!! I absolutely love Thanksgiving day. It is a special day for me to reflect about how many blessings I have and all the things I have to be Thankful for!

Now on to today's craft. I am so excited to be decorating for Christmas!! I love this holiday!!! I am so excited to be showing you my first Christmas decoration for this year!

I am going to be showing you to make cute Dollar Store Christmas Vases. You read it right...I got just about everything at the Dollar Store!!!!! We went there a few weeks ago and I decided to really look around to see everything they have there now. I seriously can't believe all that they have, especially in the craft section!! I am going to be checking them out FIRST when I am buying stuff for crafts. One thing in particular that I was happy about was styrofoam! They have styrofoam wreaths, blocks, and balls. So much cheaper to buy those things there then at an actual craft store!!

Here is what we are going to be using for todays vases:

When I said I got just about everything at the Dollar Store...the only thing I didn't get there was the ornaments. I got them at Wal-Mart. 

**I did not end up using the BIG ornaments in these vases. I just used the little ones**
-3 vases (I got 2 little ones the same and then 1 big one. They have lots of different choices)
- 1 pkg. Decorative Container Filler (which is just little foam balls) 
- 2 things of Glitter  Curly Ting. I only have 1 pictured. I decided in the end I wanted another in there. (This I was the most surprised about- that it was at the Dollar Store. I love this for decorating!)
- I pkg. Christmas ornaments. Like I said above, this is the only thing I didn't get at the Dollar Store. I got them at Wal-Mart.


To start, I went to my cricut to cut out some words. I wanted to use the phrase "Peace and Joy." I cut the words out in white vinyl. For the Peace I used Monster Paparazzi found HERE. For And I cut going up and down in the font His Name is Honey found HERE. For Joy, I used the font Pea Ashley Rose found HERE. Then I applied them on the vases. Here is what it looks like... 
Next came the fun part...getting to fill them!!!! In the two little vases I used the decorative container filler. I filled them both to the top with it. 

The big vase I put the glitter curly ting and ornaments in. 

Now we are all done!! SUPER EASY, RIGHT?!?

Here are a few pictures of these Cute Christmas Vases all done...

I am so excited to put them up in my house!!! They turned out Perfect!!


Joining the following:


Totally Inspired Tuesdays
Funky Junk's Saturday Nite Special
One Artsy Mama
http://www.thegrantlife.com/search/label/financial%20friday
Blogging tips