
I hope you all had a fabulous weekend!
The starting of ours was a little scary.
Friday morning I was doing dishes. My little boy was in the family room playing with his Tonka dump truck and being so cute with it. All the sudden he started screaming. I went over to where he was and noticed he was bleeding just under his lip. I picked him up to look at it closer and realized he had bit all the way through his lip! I started balling and had my little girl run down and grab my husband. {Thank goodness he was still home!} He looked at it and said we have to take him in. We rushed down to the instacare (this was our first time taking either of our kids in) and luckily is was small enough width wise that they were just able to glue it together. He is doing much better now!

Today I wanted to share a fun tradition with you that I recently started!
I wanted to make something cute and fun to put out for everyones Birthday in our family. Of course it had to be something that could go for both boys and girls. I racked through my brain and finally decided to make a
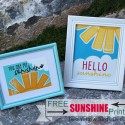
Happy Birthday Sign out of blocks.
The starting of ours was a little scary.
Friday morning I was doing dishes. My little boy was in the family room playing with his Tonka dump truck and being so cute with it. All the sudden he started screaming. I went over to where he was and noticed he was bleeding just under his lip. I picked him up to look at it closer and realized he had bit all the way through his lip! I started balling and had my little girl run down and grab my husband. {Thank goodness he was still home!} He looked at it and said we have to take him in. We rushed down to the instacare (this was our first time taking either of our kids in) and luckily is was small enough width wise that they were just able to glue it together. He is doing much better now!

Poor Little Guy:(
***********************************************
Today I wanted to share a fun tradition with you that I recently started!
I wanted to make something cute and fun to put out for everyones Birthday in our family. Of course it had to be something that could go for both boys and girls. I racked through my brain and finally decided to make a
Happy Birthday Sign out of blocks.


Here is how I made it:
I cut out 3 blocks that are 3"x3 1/2" and 1 1/2" thick and 2 blocks that are 3"x3" and 1 1/2" thick . Then I cut out a long one that is 3 1/4"x19 1/2". I wanted it thick so I could get the Birthday on it so it is 1 1/2" thick.
After I got them sanded, I painted them. I wanted to make it really bright and fun since its for birthdays. I also wanted to make it unisexual.

The colors I used are:
Big Board: Butter Cream by craft smart
The blocks from left to right:
Sea Breeze by Americana
Apple Tart by craft smart
Purple by craft smart
Light Orange by craft smart
Coral Blush by Americana
I did 3 coats on all of them because I didn't really want the wood to show through. On the light orange I did 5 coats. It wasn't going on very well!
Then I found fun Birthday paper and bright paper to match the colors of the paint. I then cut them down to size. I cut them smaller than the blocks so I could see the paint around the paper.
Next, I cut the Happy Birthday in black vinyl. For the Happy I did each letter in a different font. I wanted it to look fun. Here is what I used for each letter:
H- His Name is Honey found Here
A- Wish I Were Taller found Here
P- Bosshole found Here
P- Monster Paparazzi found Here
Y- Auburn found Here
Birthday- Elephants in Cherry Trees found Here
After I cut those out on my cricut I stuck them on to the paper. Then I mod podged the paper to the blocks. On the big birthday block I put a thin layer of mod podge over the vinyl so it wouldn't have a chance of coming off!!
Now we are done!! Super Easy and I LOVE how they turned out!!! It is just so bright and fun for everyone's birthdays!

I know everyone has loved having this out on there special day!

Oh that's fun! Very colorful, nice job!
ReplyDeleteI love it! So fun and colorful! A great addition to anyone's birthday celebration! Great job!
ReplyDeleteCute blocks. I love how colorful it is, looks so fun and festive!
ReplyDeleteSuper cute! I love this idea. And I'm so glad your little guy is okay! I'm sure that was scary!!
ReplyDeleteThese are adorable! And I love the look of your blog. I'm visiting from happygolucky's linky party.
ReplyDeleteBonny @ http://thedomesticatedprincess.blogspot.com
Thank you so much! You are too kind!
DeleteThanks for stopping by!
Jill
Adorable, Jill!! Love it, as always! So glad your blog is back. Whew!
ReplyDelete