
My daughter has finally gotten to the point where she will wear headbands! I have been waiting for this day forever!! I have gotten and made some headbands for her and she is all excited to where them, but they usually lasted only a few minutes....until recently. She has finally wanted to wear them longer! YAY!
Now that she will wear them I needed a way to organize them and store them. We had them in her dresser drawer and that was just a pain. They would get all tangled together and hard to find. I saw something on Pinterest awhile back and knew that I needed to make it because it was the perfect way to organize them!
To Make The Organizer You Will Need:

-An old Quaker Oats container
-2 Sheets scrapbook paper
-Mod Podge
-A brush
-Ruler
The first thing you will need to do is to measure the container and cut your paper to size. I didn't write them down and can't remember. Sorry!
Next, mod podge the paper to the container.
**If you need help on how to mod podge = I painted a medium thick coat on the container and then laid the paper on. I let that dry for a few minutes. Then paint a very THIN coat on top of the paper. Let that dry for a few hours. If there are any bubbles- I have learned from experience to just LEAVE THEM ALONE! They always disappear like magic! I have messed with them before and it just ruins the paper and therefore you have a flaw in the project!

With the lid I did the same thing. I cut a circle out on my cricut so it would be perfect. Then I mod podged it to the lid.

Its a little hard to see but its cream polka dotted paper.
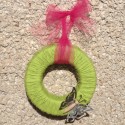
Next, I made a little stand for it....well, my hubby did all of the wood work on it. I just finished it up!! You could use a fat candle stand as well!

Then I glued it to the bottom of the container using E 6000 glue.

I let that sit for a couple of hours to dry.
While it was drying, I made a felt flower to put on the lid.

To see how to make the flower go HERE. **I did add a few extra quarter folded felt pedals to make it more full**
Then I hot glued the flower with some accordion folded glitter tulle under it. It gave it the finishing touch!

Now that its all made we can now put headbands on it to organize!!

They look so cute on there!
The best part is you can use the inside of the container for flower clips and bows or like we did for elastics and combs and brushes!! Perfect for storing all the accessories!!

It looks so cute on her dresser!! I love how it turned out!


Joining the Following:


Adorable!! I need to feed everyone oatmeal everyday for a week, so I can use the can to make one of these now! I love this idea, and haven't seen one like it yet. Well done... as usual :)
ReplyDeleteThank you so much Michala!! You are so sweet and totally made my day! You should definitely make one:) It is way nice to have them all organized and look pretty too!
DeleteThis is a great idea! Will need to do this for my girls room. thanks!
ReplyDeleteYou are so welcome! Thanks for the sweet comment and for stopping by!
DeleteAhhh! I love this! So smart! I need to make one for my little lady :)
ReplyDeleteJill that is so cute! The wood piece on the bottom really fancies it up!
ReplyDeleteTake care,
Trish
What a great idea! This would definitely take care of my daughter's headbands laying all over the place. Now we just need to finish our oatmeal! :)
ReplyDeleteMichelle @ CrazyforCrafts
http://crazyiniowa.blogspot.com/
I'd like to invite you to share this with our readers for Fun Stuff Friday @Toys In The Dryer http://www.toysinthedryer.com/2012/03/fun-stuff-fridays-16.html.
ReplyDeleteThis is so creative! A great way to keep headbands organized especially for my little girl. Thanks for linking to What I Learned Wednesday! I hope to see you again at the link party tomorrow!
ReplyDeletehttp://weliketolearnaswego.blogspot.com/.
Simply ADORABLE! Would love to have you come and link-up to the Creative Corner Hop. It opens on Monday to new links and stays open all week long.
ReplyDeleteSandy
Cherished Handmade Treasures
Stuff like this makes me wish I had a little girl. I'll just have to pin away for my grandchildren one day :) This is adorable. Thanks so much for sharing at Toot Your Horn Tuesday :)
ReplyDeleteAhhh! I love this! So smart! I need to make one Hair Accessory for my little princess :)
ReplyDeleteJill that is so cute! The wood piece on the bottom of this Hair Accessories really fancies it up!
ReplyDeletenice post and thanks for sharing
ReplyDeletebest online shopping site
That was an interesting introduction. Your plans for the future show your passion for sharing great content. You can learn more about me on my profile. Thank you for reaching out Click Speed Test - Check Clicks Per Second (CPS Score) Online. The given CPS profile explains what the test is. Thank you.
ReplyDelete